Friday 30 September 2022

Stamping Bella Bundle Girl with Balloons


Hi Again...

I'm back again for the second time today... this time with a Bellarific Friday card for Stamping Bella.

I've used the gorgeous little Bundle Girl with Balloons for my card - I coloured and fussy cut the images (yes - including those balloon strings!) - before adhering them to a background I'd created with Distress Oxides.


Card Info:
Die - MFT Stitched Rectangle
Stencil - MFT Clouds
Distress Oxides Tumbled Glass, Twisted Citron and Mowed Lawn
Colouring - Copics
Hat, Mitts and Boots - RV52/63/55
Skin - E000/00
Coat - YG11/13
Balloons - RV63/55 Y21/23 B00/01 YG11/13

Hope you like my card - it's raining very hard here in Yorkshire at the moment - so it's nice to look at a summer scene!

Happy Crafting...

Rachelle Anne Miller Garden Blooms


Hi Lovelies...

There's a lovely new release today from Rachelle Anne Miller - including this delightful Garden Blooms - with this little happy girlie busy planting seeds to grow into lovely flowers.

I know in this part of the world, it's Autumn... but there are a lot of places which are just getting into their Spring... and anyway, I love creating with Spring/Summer images!

I coloured the image - then matted and layered with gold mirri card onto dotty cardstock.  Then I added a sprinkle of glitter and it was done!


Card Info:
Card - Anna Marie Designs Dotty Pink
Colouring - Copics
Skin - E000/00/11 R20
Hair - E30/31
Top and Headband - R81/83
Birds and Pot - E21/33
Flowers - R83 Y15 V22
Sky - B0000
Grass - G43/14

Hope you like my make today and that you'll pop over to the Rachelle Anne Miller Blog or the Facebook Page for more inspiration using these fabulous digi images!

Happy Crafting...

Wednesday 28 September 2022

Honey Bee Cuts Lovely Layers Heart Vine


Hi Lovelies...

Today I'm sharing a card I made with the Honey Bee Lovely Layers Heart Vine die...  I created a background panel in white, then overlaid half of it with pink cardstock.  

I diecut the solid die twice in white - then the filigree die in gold, colouring the top white layer in pinks and greens.  I then adhered all three together so that the colours could be seen through the filigree.  I adhered the die then onto my card panel.

I finished off with a little sentiment heat embossed in gold - and I was happy how it turned out.


Card Info:
Dies - Honey Bee Cuts Lovely Layers Heart Vine
MFT Stitched Rectangles
Sentiment - MFT
Colouring - Copics

It's a simple, but effective card - and relatively easy to make.  Hope you like!

Happy Crafting...

Sunday 25 September 2022

Stamping Bella Christmas Village Backdrop, Stamping Bella Squishy Owl, Stamping Bella Tangled Cat

Hi Peeps...

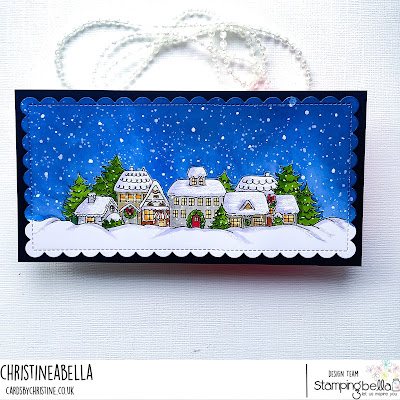
For my first Stamping Bella sneaky peek today - I've used this gorgeous Christmas Village backdrop.  I stamped it on a smaller slimline card panel, which I'd diecut with a scalloped edge.  Then I stamped the image again onto masking paper - so I could cover the trees and houses while I created a Distress Oxide blended winter sky...  splattering with white acrylic paint.

Then I removed the mask, and coloured the little scene.  I added lots of glitter to the roof of each little building and then lots to the snow on the ground.


Card Info:
Image - Stamping Bella Christmas Village Backdrop (available 26 Sept)
Die - Lawn Fawn Stitched Scalloped Rectangle Frames (which I elongated slightly!)
Distress Oxides - Tumbled Glass, Blueprint Sketch, Chipped Sapphire
Colouring - Copics
Houses - W1/2/3/4, E81/84, T0/1/3, E13/15
Trees YG25 G46
Reds - R24/46
Yellows - Y21/38
Glitter

I actually made an envelope for this card too as I have difficulty finding the size here in the UK, but they are so easy to make.

Onto my next card - which is called Squishy Owl - you'll see why...  

Firstly I coloured and fussy cut the image - then I created the background with a cover plate die, a diecut moon, and a Distress Oxide blended panel. 


I adhered the background bits together, then added the pumpkins and the squished owl on the front.  The sentiment is another from the Snuggle Weather Sentiments.


Card Info:
Dies - Mama Elephant Forest Cover Plate, L'il Inkers Stitched Circle
Distress Oxides - Spiced Marmalade, Carved Pumpkin, 
Rusty Hinge, Seedless Preserves
Pumpkins - YR61/65/04/18/27
Owl - W0/1/2/3 T0
Leaves - YG91/93

And finally - my last sneaky peek from this release...

For this Christmas card, I've used the fabulous Tangled Cat - who is all wrapped up in the Christmas lights...hope no-one turns them on!  

I coloured the image, then did a bit of die-cutting.... firstly I cut the peek-a-boo circle out of patterned paper, then I cut a circle frame in red to highlight.  I placed the cat behind the window, then popped it all on a red card.


Card Info:
Dies - MFT Jumbo Peekaboo Circle, MFT Pierced Circle, Tonic Circle
Colouring - Copics
Cat - T0/1/2/3 R00 C0
Lights - Y18 R24 YG05 YR04
Ground - R24/27/46

Hope you're loving these new images as much as enjoyed making with them - tomorrow is release day so get your shopping lists ready!

Big Crafty Hugs...

Saturday 24 September 2022

Stamping Bella Pumpkin Spice Curvy Girl, Stamping Bella Carolling Owls


Hi Again...

Today I have another two Sneak Peeks from the brand new release from Stamping Bella available this coming Monday!

Firtsly, I've used the gorgeous Pumpkin Spice Curvy Girl...  OMG I wish I still had legs like hers - I did at one time!  She is surrounded by pumpkins, and is clinging onto one tucked under her arm.  She's just about to have a drink of her hot chocolate..  I think she needs warming up after being out in the field picking those pumpkins!


Card Info:
 Anna Marie Designs Brown Dotty Cardstock
Die - MFT Stitched Scalloped Basic Borders
Gold Mirri Card
Colouring - Copics
Skin - E000/00/11 R20
Hair - E40/41/43
Dress - E13/15/18
Pumpkins - YR61/65/04/18 YG91/93/95
Shading and Grounding - W0/1/2

For my second card, I've used the Carolling Owls image..  and I decided to go all CAS and just add them to a Distress Oxide blended background.  I used different reds... then splattered with gold watercolour paint.  


I coloured and fussy cut the owls, adding them with foam pads in the centre of the panel - the lightest part of the blending.  I used gold mirri card to mat the panel to.  This is definitely a card that you need to see in real life - I love the gold on the red!


Card Info:
Die - MFT Stitched Rectangle
Distress Oxides - Abandoned Coral, Candied Apple and Barn Door
Colouring - Copics
Owls - E40/41/42/43 T0/1
Scarves - R24/27/46
Gold Watercolour Paint and Mirri Card

I have more cards tomorrow before the release on Monday... can't wait to show you them!

Happy Crafting...

Friday 23 September 2022

Stamping Bella Snuggle Owlies and Snuggle Sentiments


Hey...

I'm here again!  But this time it's with my first of the new Sneak Peeks of the fabulous release from Stamping Bella - due out on Monday!  

For this card, I've used the Snuggle Owlies, combined with the new Snuggle Weather Sentiment Set.  This set is perfect for the cooler days we're having - lots of different snuggly sentiments.

I stamped and coloured the image, adding the sentiment in the top corner.  Then I die cut it with a smaller than my usual rectangle die, adhering the panel to some patterned paper with foam pads.


Card Info:
Die - MFT Stitched Rectangle
Patterned Paper
Colouring - Copics
Owls - E40/41/43/44 T0/1
Scarves - YR04/18/27
Branch - E44/57
Leaves - YG91/93

I'll be back tomorrow and Sunday with more sneak peeks of the upcoming release...  so exciting!

Hugs...

Stamping Bella Curvy Girl Loves Halloween


Hi Peeps...

For our Bellarific Friday cards this week, we have a colour inspiration photo to follow.  I THINK I've ticked all of the boxes...  but my patterned paper has completed any of the colours that I missed!

This is the gorgeous Curvy Girl Loves Halloween..  which I coloured, then fussy cut.  I created a cloud background with Distress Oxides, then added a panel of stripey paper, edging this with gold mirri card.  I adhered the image with 3D foam pads, then added the sentiment - you get two with the image.


There's some fabulous colours in this inspiration photo, which set my imagination working.  I did use the pink for the stars on her dress, but they're difficult to see.


Card Info:
Die - MFT Stitched Rectangle
Paper - Doodlebug Design Friendly Forest
Colouring - Copics
Skin - E000/00/11 R20
Hair - C5/7/9
Dress and Shoes - R37/39/89 RV10
Pumpkin - YR61/65/04/18 YG25
MFT Cloud Stencil - Distress Oxide Tumbled Glass

Hope you like my Halloween make today.

Now watch this space, as I'll be back a little later and also over the weekend, with exciting sneak peeks of the fabulous new release from Stamping Bella - due out on Monday! 

Happy Crafting...

Tuesday 20 September 2022

Pretty Pink Posh Hugs


Hi Peeps...

Anyone need a hug?  I have a couple for you!  I've used the Pretty Pink Posh Hugs stamp and die set for my cards today..  on a gorgeous Autumn orange background.  The first card has an extra shooting star and the 'and kisses' sentiment - the second is without.  Both have been coloured with Copics and have a touch of glitter on the stars in the letters.  They are really easy to colour and cut, then I used some Press'n'Seal to lift them out of the negative part after I'd diecut them, so they had the perfect placing to add to the card after I'd put foam pads on the back.


Card Info:
Stamp and Die Set - Pretty Pink Posh Hugs
MFT Stitched Rectangle Die
Colouring - Copics
R24/27, RV63/55, Y15/18/38, YG05, BV31 B00/01

So I'm sending big hugs to you all today after yesterday's sad day here in the UK and around the world.

Happy Crafting...

Friday 16 September 2022

Stamping Bella Tiny Townie Astrology Chart


Hi Lovelies...

How fast are these weeks flying by?  It's already time for another Bellarific Friday card... this time using stamps from the current Stamp of the Month range - so for September, it's Tiny Townies.  I had no problem with which stamp to pick, as this little girlie has been waiting her turn very patiently!  

I coloured her with my Copics and then fussy cut her.  Then I die-cut a stitched rectangle panel - which I blended with Distress Oxides.  Then I used a starry background stamp, and heat embossed with sparkly embossing powder.  I chose the 'love you' sentiment from the Love Sentiment set as that's what she's saying to me - holding her arms wide!  The stamp set also comes with an astrology chart and a longer sentiment - but this time, I just wanted to use the girlie.


Card Info:
Background Stamp - Taylored Expressions Twinkle Twinkle Background
Die - MFT Stitched Rectangles
Distress Oxides - Shaded Lilac, Wilted Violet, Villainous Potion
Colouring - Copics
Skin - E000/00/11 R20
Dress - V15/09/06
Hair - E40/41/42/43
Stars - C0
Glitter

It's been a very sad week here in the UK after the passing of our wonderful Queen...  and it brings home that life is short - we thought she was going to be with us for eternity, but sadly not and we now have a new King.  I can't quite get used to that yet..  but I know he will be good for the country and carry on the Queen's work.

Anyways... to me and because of the above, I feel we need to say 'Love You' whenever we feel it, to whoever we feel it for..  hence the sentiment on my card today.  Is there someone you need to say it to??? 

Big hugs...

Tuesday 13 September 2022

Rachelle Anne Miller Pumpkin Princess


Hi there....

Today I've used another of the fabulous new release from Rachelle..  this one is called Pumpkin Princess.  This little girl is off to a Halloween ball in her very own pumpkin coach..  hope she has some strong mice to pull it!

I used Powerpoint to create the layout of the digi images - the set has lots of different images and sentiments which can be added wherever you choose - it's really easy.  I decided to have the girl actually in front of the coach, so I chose the 'move to back' option after I had the coach highlighted.  I then added the flowers, the bird and the butterfly, before printing it out.

I then coloured the image with my Copics - using lots of Autumn/Halloween colours.  I decided to add a hint of foliage around the edge of the panel by stamping an old stamp using a light brown ink pad.  Then I finally matted the panel onto some gold mirri card, then onto my card base.  I stamped a small sentiment -and it was done.


Card Info:
Sentiment - Clearly Besotted
Die - MFT Stitched Rectangles
Colouring - Copics
Coach - YR61/65/04/18
Curtains - Y18/38
Interior and Wheels - T0/1/2/3
Leaves - YG61/63/65
Girl - Skin - E000/00/11 R20
Hair and Coat - E13/15/18 YR04/18
Dress - Y18/38
Ground - YG61/63/65
Crown/Butterfly/Flowers/Bird - Y18/38 YG61/63/65 E13/15/18

Hope you like my make today as much as I enjoyed making it.  The leaves are quickly falling here in the UK, so I'm certainly getting into the Autumn mood!

Happy Crafting...

Friday 9 September 2022

Stamping Bella Mochi Fall Girl


Hi All...

It's a very sad time at the moment in the UK..  with the awful news we heard yesterday.  Our Queen has been a part of our the whole of my life... she was on the throne before I was born, and has been the one constant.  And now she's passed, my thoughts are with her family.. and I'm afraid I keep having a little cry.

But.... crafting is always a way to help focus the mind... and this card I made certainly helped me.  This is Mochi Fall Girl... and as the leaves are turning brown here (a little early!), I knew this image was perfect to use for my Bellarific Friday card.

I coloured her on a panel, then added a tiny die cut layer of patterned paper, which I'd edged with a border die.  I was able to cut around her elbow on the coloured panel, so I could allow her to 'lean' onto the patterned paper.  Know what I mean??


Card Info:
Dies - MFT Stitched Rectangles, Paper Smooches Dots and Dashes
Colouring - Copics
Skin - E000/00/11 R30
Hair - E50/51/53/55/57
Scarf - YG91/93/95
Coat - R37/39 E07/19
Leaves - YG61/63 E13/15/18 G94/99
Cup - RV42/14

There is a fabulous sentiment that comes with this Mochi Girl... but I didn't have room for it on my card, so it's going to be a 'just because' card with no sentiment!

Hope you like my make today...

Crafty Hugs...

Wednesday 7 September 2022

Pretty Pink Posh Darling Dragonflies


Hi Lovelies...

Today I'm sharing a card I made with a lovely stamp and die set that I bought a little while ago..  why oh why I didn't use it sooner, I'll never know!

Anyways... they're out of their packet and flying happily!  These are the Darling Butterflies from Pretty Pink Posh..  they're so cute and so easy to colour and die cut.  

I created a partially smooshed background with some pink watercolour paint - then splattered it with white and silver to give sparkle.  I coloured and die cut the dragonflies.... giving their wings even more sparkle!  Then I adhered them with foam pads so they stood out from the card.  I stamped the sentiment and heat embossed with silver embossing powder... difficult to show on photographs, but lovely in real life.  Lastly I adhered the panel to the card base using adhesive fun foam.


Card Info:
Images and Dies - Pretty Pink Posh Darling Dragonflies
Sentiment - Mama Elephant Scripty Birthday
Die - MFT Stitched Rectangles
Colouring - Copics
RV52/63/55
Glitter
Pink, White and Silver Watercolour Paint

Hope you like my pink make today...  even though I'm trying to use a bigger range of colours, I have to have my pink 'fix' every now and again!

Big Crafty Hugs...

Sunday 4 September 2022

Rachelle Anne Miller Autumn Friends


Hi Peeps...

Today, for my card, I've used one of the fabulous new images from Rachelle - this one is called Autumn Friends...  this cute pair are sitting in a pile of crispy leaves enjoying looking at their book!  

It's certainly an early Autumn her in the UK..  lots of leaves are turning brown - due to the prolonged dry weather we've had over the last couple of months.  Think it'll make for a long winter!


Card Info:
Die - Li'l Inkers Stitched Square
Paper - Anna Marie Designs Dotty
Colouring - Copics
Skin - E000/00/11 R20
Girl:  Hair - E50/51/53 and E15/18 Scarf - RV32/34 Coat - BG11/13
Boy:  Coat - G43  Hat - W0/1/2
Book W0/1/ T4
Leaves - YG91/93/95 E84 Y26
Dog - E84/81/33
Shading - B0000/000

The advantage of digital stamps is that you can resize them easily to fit any space you like before you print..  and a big plus, is that you don't have to fit them into your craft room... they just take space on your computer.

Hope you like my make today... you can see more inspiration using Rachelle's new releases if you head over to her blog... here.

Happy Crafting...

Friday 2 September 2022

Stamping Bella Tiny Townie Astronauts


Hi Lovelies...

Time for another Bellarific Friday card - and as it's September, we have a new Stamp of the Month - this time it's these Tiny Townie Astronauts - there's four in the pack with two sentiments - and you can get them for half price from Stamping Bella throughout September.

I've blended a space-type background, splattered with white then stamped with a fabulous starry background embossed with sparkly embossing powder.  Then I've coloured and fussy cut the astronauts, adding a little glossy accents here and there.


Card Info:
Taylored Expressions Twinkle Twinkle Background Stamp
Die - MFT Stitched Rectangles
Distress Oxides - Wilted Violet, Mermaid Lagoon, 
Blueprint Sketch and Chipped Sapphire
Colouring - Copics
Spaceships - C0/1/2/3
Lights - Y21/23
Suits - BV20/31 R35 B24/26
Hair - E11/13/15   E50/51/53
Skin - E000/00/11

The sentiment I've used comes with the set, and I think is perfect for this card - dream it - do it!

Happy Crafting...