Thursday 27 June 2024

40th Birthday Card


Hi Lovelies...

It was my eldest daughter's birthday yesterday - can you guess how old she was??  LOL!  

Well, her favourite colour is turquoise, so that was what I decided to go with.  I smooshed some 6" x 6" bristol smooth card with Distress Oxides for the background, then die cut a white stitched square, then cut a square aperture in the centre.  I'd die cut lots of flowers at the weekend, ready to be used to decorate around the numbers, which I'd cut from silver mirri.  I adhered the numbers then the flowers, and gave them a little sparkly centre of each with Nuvo Drops.


Card Info:
Number Dies - Paper Trey Ink
Flower Dies - no name (sorry)
Lil' Inkers Stitched Square, MFT Inside/Outside Stitched Square
Distress Oxides - Tumbled Glass, Peacock Feathers 
and Mermaid Lagoon
Silver Mirri Card
Nuvo Drops

My daughter loved her card so I'm OK to show it... hope you love it too!

Hugs...

Tuesday 25 June 2024

Lavinia Stamps Berry Branch


Hi Lovelies...

Today, my cards are made to send to anyone who needs a thought or two... it's always good to have them in my drawer, ready to use.

Firstly, I stencilled a rectangle on my card panel, then I stamped a large font style stamp on each over the rectangle and the white.  I then used a really deep grey ink to stamp the branches on each, followed by a tiny sentiment and some gems.  I matted and layered onto some coloured cardstock and they were finished.


Card Info:
Image - Lavinia Stamps Berry Branch
Sentiment - Clearly Besotted Fancy That set
Stencil - Taylored Expressions Rectangle
Font Stamps - MFT Romantic Script, MFT Typewriter Text
Distress Oxides - Shabby Shutters, Bundled Sage, Peeled Paint
Lost Shadow and Shaded Lilac
Picket Fence

Here's another I made in lilac - same method.


You have to look really close to see the font stamped across each of the card panels.. I stamped in Picket Fence but that has taken up the colour from the rectangles.

Hope you like...

Hugs

Thursday 20 June 2024

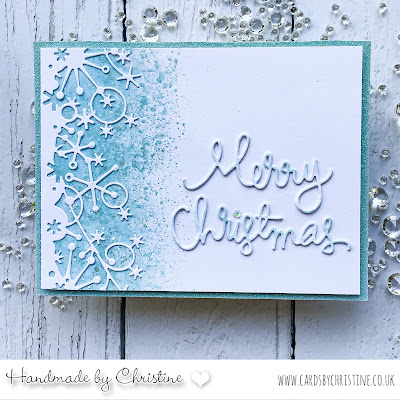
Memory Box Frostyville Border


Hi Lovelies..

I've been rummaging through my older dies for my card today and found this Memory Box border, plus a Simon Says Stamp word die that I think looks good with the border.  So, I know I'm a bit early.... but it's Christmas in June in my craft room!

I was inspired by Natalie Bowers seeing one of her videos from last Christmas..  she really is a good tutor and her videos inspire me every time.  Take a look at her NB Cards YouTube channel... you'll love it!  https://www.facebook.com/groups/325157827189927 


I did some smooshing with the Tumbled Glass mixed with a little Cosmic Shimmer white pearl mica powder, to give the lustre effect (which is difficult to see on the photos!)  Then I adhered the border.  I die cut the sentiment from a spare piece of smooshed card, also cutting two more from white card.  I adhered the three together, to give dimension and depth to the sentiment, before adhering to the card.  Finally, I added a tiny crystal for the dot on the i, then matted the card panel onto glitter card to match, using fun foam to back the panel.


Card Info:
Dies - Memory Box Frostyville Border, 
Simon Says Stamp Merry Christmas
Distress Oxide Tumbled Glass
Cosmic Shimmer White Pearl Mica Powder

Now I took a few photos of my card as each time I got a different look, depending on how the light caught it.  It's only natural light, as I take my photos on a window ledge.  I think the first and last photos are the closest to the colour I see when I look at the card.

Hope you like my card today..

Hugs

Monday 17 June 2024

Paper Rose Studio Gum Tree Border


Hi Lovelies..

For my cards today, I've used an older border die from @PaperRoseStudio called Gum Tree Border.  I die cut two from white cardstock and put to one side while I created Distress Oxide blended panels for behind the border.  

I then adhered a die cut border onto each coloured panel, adding a couple of fine strips of gold mirri card at the edges, plus a tiny gold diecut butterfly.  Finally I added a gold embossed sentiment.


Card Info:
Paper Rose Studio Gum Tree Border
Distress Oxides
Gold Mirri Card
MFT Sentiment

These are so easy to make and I think look very effective.  Hope you like them too.

Hugs

Monday 10 June 2024

LOTV Trio of Teddies


Hey Peeps..

Today I'm sharing a card that I made with a stamp set from my stash, that I bought and used last in 2012!  That's 12 years ago!!! 

It's from an LOTV set called Trio of Teddies.. but this little guy is my favourite with his bunch of flowers...


I coloured and fussy cut around the image, then die cut a rectangle and inked up and stamped a sentiment from another old LOTV set!  I adhered the teddy with 3D foam tape, then adhered the rectangle to the card base again, with foam tape.  I'd popped some stripey card to give interest before adhering the rectangle.


Card Info:
Image - LOTV Trio of Teddies
Sentiment - LOTV Sentiment Set 26
Die - Waffle Flower
Colouring - Copics
Teddy - E30/31/33/34/59
Flowers - RV55/63/17
Background - B60

I kept the design relatively CAS so the Teddy has pride of place.  

Hope you like!

Happy Crafting...

Friday 7 June 2024

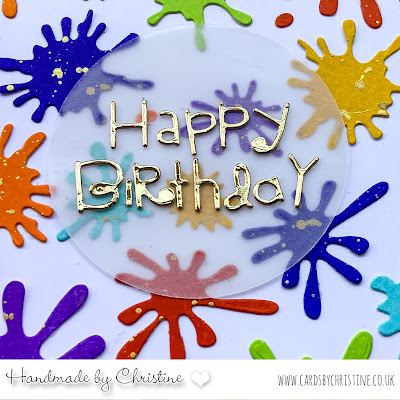
Paint Splats


Hi Lovelies...

Today I'm sharing a really fun card that I made using some paint splat dies.  I was inspired by a card by Natalie Bowers on Facebook - thanks Natalie.

I die cut lots of splats from card that I'd coloured with Copics and splattered with gold watercolour paint.  I adhered them to my card panel, trimming around the edges to fit.  Then I used an old die set from Paper Smooches (so no longer available), for the sentiment which I cut from gold mirri card.  I adhered a circle of vellum to the card, then finally added the letters.  


I matted and layered the panel to some red cardstock - it gave a another bit of brightness.


Card Info:
Dies - Paint Splats 
Birthday Words from Paper Smooches
Copics
Vellum
Gold Watercolour Paint

I was really happy how this card turned out, I think it's perfect for a youngster!

Happy Crafting..

Wednesday 5 June 2024

Spellbinders Magnolia Blooms


Hi Lovelies...

For my card today, I was inspired by a card that I saw a couple of years back from Tina at Cards and Coffee Time.  I keep inspirational cards in my 'to try' file which I look back on from time to time.  I finally managed to get to buy the die set from Spellbinders, so I was able to play!

I loved how Tina did the colouring - so easy done, as the die comes in two parts - the filligree flower outline, and then there's a slightly larger background.  Both are cut in white, then using Distress Oxides, just blend a little colour on the background panel, roughly behind where the flowers will be.  The leaves are coloured on the filigree top, being careful not to catch the outline of the flowers.

Then, the flower outline is adhered over the coloured background - and WOW... so effective! I then used 3D foam tape to adhere to my card panel, trimming off the edges of the flowers and leaves to fit.


Card Info:
Die - Spellbinders Magnolia Blooms
Inks - Distress Oxides (a light and a dark for each colour)
Sentiment - MFT
White Nuvo Drops

So I would love to thank Tina for the inspiration and the tutorial.. I know I'll be making more of these soon!

Happy Crafting...

Hugs