Tuesday, 19 December 2023

It's SANTA!!!


Hey Peeps...

Yes, I've been quiet for a while...  I've just been having a little break from my rushing to get things on line etc... it's done me good I think.  But I did make all my Christmas cards early, which was great..  and then I made this one for my Grandchildren...  of course it's the very person they're hoping to arrive at Christmas!

The stamp is an older one from CC Designs when I was part of their Design Team - so it's a few years old - but the rubber is still in perfect condition and Santa winked at me when I was looking through my stash, so out he came to be coloured up again this year!

I did some Distress Ink blending for the background, then stamped with Versamark using the Taylored Expressions Twinkle Twinkle background.  I coloured and fussy cut the Santa and adhered him to the background.


Card Info:
Image - CC Designs Santa (no longer available)
Background - Taylored Expressions Twinkle Twinkle large stamp
Die - MFT Stitched Rectangles
Distress Inks - Tumbled Glass, Blueprint Sketch, Chipped Sapphire and Black Soot
Colouring - Copics
Skin - E000/00/01/11 E20
Suit - R24/27/46 E57
Boots and Belt - C5/7/9
Beard and Gloves - T0/1
Fur - C0/1/2
Sack - E30/31/33
Gift - YG17 R24/27/46

Hope you like my make for the kiddies...  I stamped a few of the Santas onto card for them to colour in themselves...  my 5 year old grand-daughter got down to her colouring straight away!

Big Hugs - and if I don't post before the day.... A VERY HAPPY CHRISTMAS to you all and thank you for visiting my blog!

Saturday, 9 December 2023

Pretty Pink Posh Winter Foliage Stencil Set


Hey Peeps..

Well this card took a LONG time to be finished!  I did the stencilling before last Christmas, but never got around to completing the card before Christmas arrived - so I decided to finish it off!

I used the Pretty Pink Posh Winter Foliage Stencil Set for the background, stencilling onto kraft card and shading the edges.  Then I used an Avery Elle stamp set for the centre sentiment called Merry Circle Tags.  I stamped it in Memento Rich Cocoa Ink to match the kraft.

I matted both the sentiment and the background onto gold mirri card and it was done. 


Card Info:
Background and Sentiment - as above
Dies - Lil' Inkers Stitched Squares
Tonic Studios Scalloped Circles
Distress Inks

Hope you like my make today!

Happy Crafting... 

Monday, 4 December 2023

MFT Christmas Selfies


Hi Lovelies...

Today I'm sharing a couple of cards made with an older MFT stamp... I'm determined to use some of the older stash that sits in my craft room, before getting on to all the stash that hasn't yet been touched!  I think it actually does us good to see what we can come up with with older stamps, don't you?


This stamp set is the original MFT Christmas sELFies, not the newer one.  I've used them before, but know there are endless possibilities with this set.


Card Info:
Images - MFT Christmas Selfies
Sentiment - Paula Pascual Christmas Messages
Snowy Embossing Folder
Gold Mirri Card
Glitter


Hope you like my Christmas makes!

Happy Crafting....

Friday, 1 December 2023

Simon Says Stamp Wishing


Hi Peeps...

Sorry for the quiet week - I actually have been making, but looking at and using some of my older stash and my inspiration file... as I've felt a bit low.  It always does me good to look back - and this card today, I think was inspired by one from Lisa at I'm in Haven blogspot... and I've been meaning to make it for some years, so now was the time!  Thank you Lisa for the inspiration.

The flower is made by using a few of the petals and a stem from the MFT Fresh Cut Flowers die set - then I cut a panel with a diecut border to adhere the flower to.  I added the diecut Wishing word, then stamped the sentiment.  I adhered the panel to the orange card base, then added some gems to finish.

Card Info:
Flower - MFT Fresh Cut Flowers Die Set
Word - Simon Says Stamp Wishing Die
Sentiment - Simon Says Stamp Sending and Wishing Stamp Set
Border - Pretty Pink Bosh Eyelet Border

Hope you like my make today..  it did it's job and cheered me some!

Happy Crafting...

Wednesday, 22 November 2023

Lawn Fawn Merry Mistletoe


Hi Peeps

Today, I've used this lovely little die set called Merry Mistletoe - it's from Lawn Fawn, as is the paper I used also.

I cut all the bits from white card, then coloured the diecuts in the greens and reds that I'd chosen.  I then adhered to the panels and added the tiny sentiment.


Card Info:
Dies - Lawn Fawn Merry Mistletoe, MFT Double Stitched Rectangles, MFT Stitched Rectangle
Paper - Lawn Fawn Really Rainbow Christmas
Sentiment - Clearly Besotted Fancy That
Colouring - Copics
YG17 G82 E81 R24/46

Hope you like my card - it's quite an easy one to make but has an elegant touch.

Happy Crafting...

Monday, 20 November 2023

Honey Bee Stamps Winter Village


Hi Lovelies..

I have another Christmas card to share today - one I really loved making as there was lots of cutting and sticking!

I used the Honey Bee Stamps Winter Village die set - which gives another building too, but I didn't have room for the three.  I cut it all from white card, before colouring with Copics in the shades I wanted.  Then I used Distress Oxides with white ink splatters for the background, adding some snow drifts edged with glitter.  I adhered the church and the cottage, then finally added my sentiment in the sky.


Card Info:
Die Set - Honey Bee Stamps Winter Village
Snowdrifts - MFT Rolling Hills die set
Sentiment - Penny Black Joy to the World
Distress Oxides - Broken China, Blueprint Sketch, Chipped Sapphire
Copics - B34/21/23/24/26 YR27, Y21 E42/43 R08/24/27/46 B60 C1/2

Hope you like my Christmas make today!

Happy Crafting...

Friday, 17 November 2023

Purple Onion Designs Jolly the Snowman


Hi Lovelies...

Today I'm sharing a card I made with a fabulous, new stamp that I received from a lovely, far away, friend - and as she suggested, I couldn't resist giving the image a pink sky background!

I did a bit of no line colouring for the little guy, using pale blue/grey colours to shade him.  Then I fussy cut him, and set him aside while I created the background.

I diecut a stitched rectangle, then added a strip of post it tape to the base for the snow, before blending the pinks.  Then I splattered the snow.  I added a small, old Paula Pascual sentiment, before adhering the snowman with foam pads.  Lastly, I used foam tape to adhere the panel to my card base - which is actually navy blue, but difficult to see on the photos.


Card Info:
Image - Purple Onion Designs Jolly The Snowman
Sentiment - Paula Pascual Christmas Messages
Distress Oxides - Spun Sugar, Kitsch Flamingo and Picked Raspberry
Colouring - Copics
Snowman - B60/63 C2
Nose - YR04/18
Buttons - C5/9
Scarf - YG23/63
Arms - W04/05
Sequins and Glitter
White Ink for the snow

Hope you like my snowman as much as I enjoyed making with him!

Happy Crafting...

Friday, 10 November 2023

Concord & 9th Festive Corner Cuts


Hi Lovelies...

I'm here with another Christmas card today... I seem to be getting into the Christmas spirit a little earlier than I usually do - which makes me happy!

I've used this gorgeous die set from Concord & 9th for my card after seeing Kristina Werner using it - there's lots of die cutting involved, but no colouring, so it's a nice change!  I cut the lattice corner twice and adhered them to glitter card in each corner with 3D foam tape.  Then I cut the flowers and adhered them down the centre  of the card.  Lastly, I diecut the Noel word from gold, with the shadow in white.  I cut the tiny centres for the flowers in Champagne glitter card so they would pop.  Finally, I adhered the panel to a red base, to match the flowers.


Card Info:
Die Set - Concord & 9th Festive Corner Cut
Glitter Card
(that's it!!)

I'm really pleased how it turned out - hope you like it too!  

Happy Crafting...

Tuesday, 7 November 2023

Woodware Robin Bubble Stack


Hi Lovelies...

For my card today, I've used a new stamp to me... this is the Robin Bubble Stack from Woodware.  

I stamped and coloured the image, then masked them with masking paper, before using Distress Ink to create the blue background.  I splattered with white ink to create the snow.  I then stamped and coloured another image, this time fussy cutting the robins.  I used a dry embossing tool to make them slightly domed... before adhering them with foam pads.

Then I used a die to create the frame from glitter card, and stamped the sentiment which I matted with more glitter card.


Card Info:
Image and Sentiment - Woodware Robins Bubble Stack
Die - SBD Denmark 149
Distress Ink Faded Jeans
Colouring - Copics
R24/27/26 E57 E23/25/27

Hope you like my card - it was not the easiest to photograph - both because of the length, and because we've not had good 'photography weather' (ie, very little light) for the last few days!

Happy Crafting..

Friday, 3 November 2023

Paper Roses Studio Heart Confetti Circle


Hi Lovelies...

I'm sharing a card today that I made for a lovely friend....  it was a relatively easy card to make, in that there's no colouring... but there IS lots of die-cutting and sticking!

I used a heart circle die from Paper Roses, and have laid some colours behind the hearts.  I used the watercolour circles from LOTV.  Then I diecut the square and layered it onto my card base with 3D foam tape. I cut the word from gold and the shadow from white... then adhered them to the heart.


Card Info:
Dies - Paper Rose Studio Heart Confetti Circle, Lawn Fawn Stitched Scalloped Square, 
Spellbinders Yana's Scripty Sentiments
LOTV Watercolour Circles Digital Image

Hope you like my make today... 

Happy Crafting...

Tuesday, 31 October 2023

Mama Elephant Fly With Me


Hey Peeps...

Today I'm sharing two cards that I've made recently, for my two youngest grand-daughters, who both turned one within a couple of months of each other.

For each card,  I coloured and fussy cut the image I chose from Mama Elephant Fly With Me stamp set. Then I cut a large number one out of patterned paper, then backed that with pink cardstock. I used a Spellbinders embossing folder for the background which I matted and layered, then I adhered the number and the image with foam pads.  Finally, I added some Stickles around the edge of the number and also around the card.  Sooo difficult to photograph!


Hope you like my cards today!

Happy Crafting...

Thursday, 26 October 2023

Pink Fresh Studio Foliage Shaker Set

Hi Lovelies...

Today my card is relatively CAS - it's a diecut leaf, inlaid with glitter card!  It's actually a leaf from the Pink Fresh Studio Foliage Shaker set - I cut the outline once from gold mirri card, and cut the full leaf twice from kraft, adhering them together to give depth.  

Then I recut the leaf, but this time from glitter card - and inlaid the glitter bits into the leaf.  Does that make sense?? Hope so!  I adhered the completed leaf to a diecut panel with foam pads.

I added a sentiment that I love using that is an oldie from Paper Smooches then adhered the panel to my card base.


Hope you like!

Happy Crafting.....

Tuesday, 24 October 2023

Spellbinders Holiday Floral Swag


Hi Peeps...

OK, yes, it's only October, and yes, I only generally start my cards in November for 'that occasion we don't mention' yet.... BUT, I managed to get hold of this gorgeous Christmas die from Germany, thanks to a lovely friend, as the company won't post to the UK yet.  I'd already got my sticky mitts on the Spellbinders Embossing Folder, and so the two came together happily!

I embossed a square panel of red card, then used Distress Inks to darken the edges, before I splattered this with gold Kuratake watercolour paint.  Then, I diecut the word die three times, the first in gold mirri card, then two others from kraft card, adhering them all together and adding to the panel.  

Lastly, I added the panel to a square of gold mirri card, and called it done.  I've got a bit of a tendency to add more bits than necessary, so this time, I decided to keep it relatively CAS.


Card Info:
Embossing Folder - Spellbinders Holiday Floral Swag
Christmas Word Die - Alexander Renke Christmas Typo
Gold Mirri Card
Distress Inks - Lumberjack Plaid, Aged Mahogany
Gold Water colour Paint

I am really happy how this card turned out, even though I broke my own 'not until November' rule.  Hope you like it too!

Happy Crafting...

Friday, 20 October 2023

Stamping Bella Curvy Girl Witches 3


Hi Lovelies..

It's Bellarific Friday time again... this time the theme is 'Any Fall Themed Stamp' - well mine is for Halloween, which is definitely in Autumn/Fall..  so hopefully it's OK!

I used the Curvy Girl Witches 3 for my card, colouring them, fussy cutting, and sprinkling them with glitter.  Then I created a background with Distress Ink blending, masking a moon first.  I sprinkled the sky with water and white paint - then coloured the moon slightly, adding some spooky looking birds (I can't draw bats!) and a few twigs along the side.


Card Info:
Die - MFT Stitched Rectangles
Distress Inks - Faded Jeans, Black Soot, Mustard Seed
Colouring - Copics
Witch 1 - Hair - \YR04/18 E08/18
Dress - G09/17/29 BV11 V25/22/17/15 RV55
Witch 2 - Hair - E41/42/43
Dress - YR18/27 RV69/34
Witch 3 - Hair - E23/27/29
Dress - T0/1/3/5/7/9 YR65

Hope you like my spooky make as much as I enjoyed making it!  Don't forget to pop over to the Stamping Bella Blog to see more inspiration from the Babes, and also to the Facebook Sistahood Page - to chat and share all things Bella related.

Happy Crafting....

Thursday, 19 October 2023

Whimsy Stamps Happy


Hi Peeps

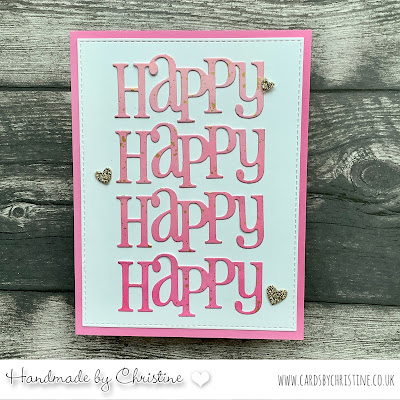
I have a 'Two For' make today...  I used the Whimsy Stamps Happy Word Die on a Distress Ink Blended background, that I'd splattered with gold - cutting four times above one another.  I adhered the panel to acetate, then used foam tape to adhere the panel to a piece of glitter card.  Soooo difficult to photograph to show the effect!  I added a couple of diecut stars to finish.


Then.... with the words that I'd cut from the pink card, I created a second card, placing the words in a similar place...  making it an easy CAS card.


So that was my 'two for'!


Hope you like my cards today!

Happy crafting...