Friday 23 August 2024

Simon Says Stamp Swing Blossoms


Hi Lovelies...

For my cards today, I used a new die that I bought from Simon Says Stamp.. it's called Swing Blossoms - and of course, when I saw it, I knew I'd have to buy it!

So, I diecut it from white cardstock, which I then coloured with Copics.  Even though the main die has the flowers on...  there are separate flowers to be coloured and adhered to the main die cut.  I also cut these flowers from gold glitter card, so I could just use the centres in the pink.

I then diecut a stitched, scalloped circle from from MFT in pink card, to lay the blossom diecut onto.  I put plain card behind the frame, which I'd stamped with the sentiment.

I used a swiss dots embossing folder to create the background, then adhered the circle.  Lastly, I layered the dotty background to a pink square panel.  I added some gold flower centres under the sentiment, then a butterfly that I'd diecut in gold mirri card.


Card Info:
Dies - Simon Says Stamp Swing Blossoms, MFT Stitched Scalloped Circle Frame
Hero Arts Butterfly Confetti
Colouring - Copics

Now, I created a second card, using similar colours on the blossom, but using a plain white card panel and base, and a diecut 'hello' word from the Altenew Sweet Sentiments set using glitter card.


I wonder which is your favourite??


Hope you like what I made...

Big hugs

Monday 19 August 2024

Leaf Branch Rainbow Colours


Hi There...

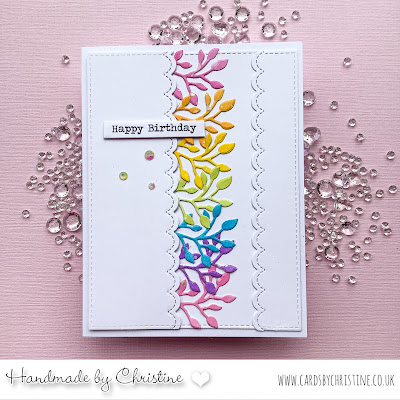
Today I'm sharing three cards I made with a similar design...  using a tiny branch/leaf die that I cut from card that I'd shaded with Distress Oxides and splattered with water and gold watercolour paint.

They were relatively easy to make after the DO blending and diecutting...  I laid the diecut branches to one side, then cut a stitched rectangle card base, and another stitched rectangle that I used border dies about a third of the way along.  I added thin foam tape under the smaller panel, adhering the branches/leaves to the back, so that they showed under the diecut edge.  Following so far???

I adhered the small panel to the larger card panel, making sure the edges matched.  Then I added a small sentiment that I'd created on the PC, with the thin foam tape... and a few gems to finish.  Finally I adhered the panel to my card base.


Card Info:
Dies - Leaf/Branch - no name, sorry; MFT Stitched Rectangle Dies, 
Pretty Pink Posh Stitched Borders, MFT Stitched Scalloped Basic Edges 2
MFT Skinny Strips (for sentiment)
Sentiment own - made on PC
Distress Oxides - Kitsch Flamingo, Dried Marigold, Scattered Straw, 
Twisted Citron, Mermaid Lagoon, Wilted Violet
Gems
Gold Watercolour Paint

Scroll down for different versions!


For this one, I put an extra scalloped border on the right hand side - mainly because I spilled a drop of glue, so had to cover it up! See? We can generally make things right after a mess!


And lastly - one with a different border die - I just didn't think it was a large enough pattern for the card.


I'm sorry about the photographs - both the amount, and the standard!  It's been raining here today, so we've had no brightness to get good pics!

Anyways.... thanks for sticking to the end... hope you like my cards, which I promise look better in real life!

Big hugs

Saturday 17 August 2024

Spellbinders Layered Anemones


Hi Peeps...

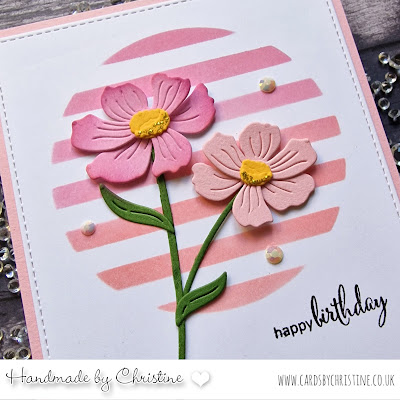
Today I'm sharing another card using Spellbinders dies..  this is a relatively CAS one compared to the last, with just the two flowers and the stem.

I decided to do bit of stenciling for the background - I used two stencils - one striped and one circle, then two Distress Oxides to give a graduation of colour.

Finally I added a little sentiment, then layered the panel onto a pink base, and it was done.


Card Info:
Dies - Spellbinders Layered Anemones, MFT Stitched Rectangles
Stencils - Pretty Pink Posh Wide Stripes, Taylored Expressions Circle
Distress Oxides - Kitsch Flamingo, Worn Lipstick and Fossilized Amber
Sentiment - Clearly Besotted Fancy That
Gems

 Hope you like what I did... I think I may make a few of these to have in stock, maybe in different colours etc.

Happy Crafting...

Tuesday 13 August 2024

Spellbinders Be Bold Blooms


Hi Lovelies..

Today, my card is one I've wanted to make for ages - I've had the die set quite a while, but I knew it would take a bit of organisation and lots of die-cutting etc to get done.... which put me off starting it for a little bit!

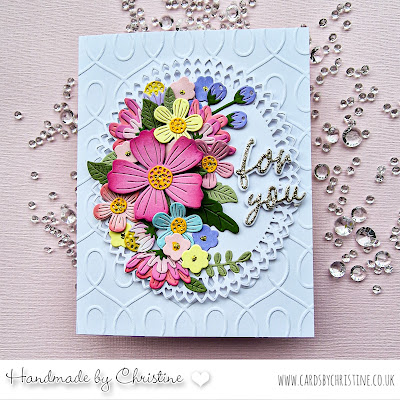
Anyways...  I got around to it this weekend...  and I was right!  My desk looked like a tip by the time I'd finished with lots of little bits of coloured card etc!  It's a large die set, so firstly, I cut a magnetic sheet to keep all the dies in their place while I used them - and hey - I didn't lose one!  I used Distress Inks onto white card for some of the colours, and used pre-coloured card for others.  I laid all the flowers onto a diecut oval and adhered them slowly until I was happy with their placement.  I added the oval to a piece of embossed cardstock then onto my card base, and lastly, added a small sentiment that I'd die cut from gold glitter cardstock, with a white shadow.  Finally, I added a touch of gold glitter glue on to the centres of the flowers.... better seen in real life.


Card Info:
Floral Die Set - Spellbinders Be Bold Blooms
Oval Die - Spellbinders Oval Bliss
Embossing Folder - Spellbinders Loops Embossing Folder
Sentiment - Altenew Sweet Sentiments Dies
Gold Glitter Card and Gold Glitter Glue

I've got to say, it took me a fair amount of time to complete this card - both for the design thinking and then the making, but I didn't sit at it for long each time - life was busy, so my card making takes a back seat!

And now I've seen what it looks like finished, I know I'll make more!  I've got a lot of flowers and leaves left still to use, so another one at least, will be easy!

Hope you like...

Hugs

Wednesday 7 August 2024

WPlus9 Doodle Buds


Hi Lovelies...

For my card today, I decided to go bold!  I've had this stamp set from Wplus9 for some years (I think I've only used it once, if that...), but it's a set that always makes me WANT to make a card...  so with my lack of mojo, out it came!

I coloured the flowers in bright colours, then fussy cut them and laid them around and adhered them to a circle die cut - which I'd stamped with one of the sentiments in the set.

Then I created my card base by adhering designer paper to one side, and some embossed card on the other.  I added the circle and a few gems to finish, and it was done.


Card Info:
Images and Sentiment - Wplus9 Doodle Buds
MFT Pierced Circle Die
Crafters Consortium Ink Drops Candy Paper Pad
Altenew Angled Mosaic Embossing Folder
Colouring - Copics
RV63/55/17  BG11/13  V04/06/09
YR61/65/04/24  G24/46
White Gel Pen
Gems

Hope you like how it turned out as much as I did!

Big hugs...

Thursday 1 August 2024

Waffle Flower Daisy Background

Hi Lovelies..

Firstly, I'm sorry that I've not been posting much recently - life has been busy, and to be quite honest, I've felt a little overwhelmed with the amount of stash in my craft room.  Yes, I admit it, I'm a craft-aholic!!  I go in there and am over-faced!  I don't know what to pick up and make... so end up doing a tiny bit (yes, a very tiny bit) of tidying. It all needs a clear out and a declutter... hopefully I'll get to do that soon, so my mojo may come back!  Anyone recognise the feeling??

Today I'm sharing a card a made a couple of weeks back - using the gorgeous Daisy background stencil from Waffle Flower.  I used Distress Oxides through the stencil, and added a tiny bit of glitter in each flower centre.  

Then I diecut the Smile word and shadow from Honey Bee, and a tiny flower from Creative Depot.  I used rose gold matt card for the word and the flower, giving them depth by cutting each die 3 times and layering them together.


Card Info:
Waffle Flower Daisy Background Stencil
Honey Bee Stamps Smile/shadow die
Flowers - Creative Depot Doodle Blumen
Rose Gold Matt Cardstock
Distress Oxides
Glitter


I struggled to get a photograph that shows the colour the card actually is - but these are the best of a bad bunch.  Think (and I hate to say this), that it was TOO light for the photos!

Happy Crafting..