Monday 27 February 2023

Penny Black Happy Birthday


Hi Peeps..

Today I'm sharing a card I made using Alcohol Inks..  this panel has been sitting around in my craft room for a while, so I decided it was time for it to be front and centre!

I did a bit of matting and layering with the panel and gold cardstock.. then onto the card base.  Then I used the Penny Black Happy Birthday die - cut three times and adhered together - adhering to the card.  I added a few die-cut stars and hearts in gold here and there, and it was finished.


Hope you like!

Happy Crafting...

Friday 24 February 2023

Stamping Bella Gnome Hippie


Hi Lovelies...

Time for another Bellarific Friday make - and as it's the last Friday of the month - we are using images from the latest release.

I chose to use this fabulous Gnome Hippie stamp for my card - colouring him up in psychedelic colours then fussy cutting.  I created a stenciled background for him - with lots of hearts (after all hippies were all about love) - then I adhered him with foam pads.  I stamped the sentiment over the stencilling, then added a couple of sequins - and it was done. 


Card Info:
Die - MFT Stitched Rectangles
Stencils - Taylored Exressions Rectangles, MFT Lots of Hearts
Distress Oxides - Shaded Lilac, Wilted Violet, Villainous Potion
Colouring - Copics
Skin - E000/00/01 R20
Beard - T0/1
Hat - BG32/24/49
Coat - V15/17
Sunglasses YR04 T5/7/9
Flowers - RV63/55 Y15/18
Guitar - E21/23 W3/5
Hankie - G14 YG23
Sequins

I really loved colouring this Gnome Hippie.... as I was a hippie in my day (yes I'm THAT old!) and loved wearing all those wonderful colours!

Peace and Love.... (and Happy Crafting..)

Thursday 23 February 2023

Polka Doodles Honey Pie Just Lovely


Hi Lovelies...

This little cutie has been sitting on my desk, all coloured up, for a few weeks... so I decided it was time for her to be popped on a card!

She was coloured and fussy cut - then I diecut a circle, to sit her on with 3D foam pads.  I used some paper from my stash for the background, then I added a tiny sentiment I'd previously cut a lot of, and the card was done!


Card Info:
Image - Polka Doodles Honey Pie Just Lovely
Sentiment - MFT Itty Bitty Sentiments
Dies - MFT Pierced Circle, Li'l Inkers Stitched Square
Colouring - Copics
Hair - E21/23
Skin - E0000/000/E01 R20
Dress - R81/83/85
Bows and Hearts - R24/27/46 E57
Shadow - T0/1

I always enjoy making 'just for fun' cards - they get popped into my stash to send to someone when kind words are needed.

Happy Crafting all...

Friday 17 February 2023

Stamping Bella The Owl and The Heart


Hi All...

Wow - it's Bellarific Friday time again - the weeks seem to fly by!

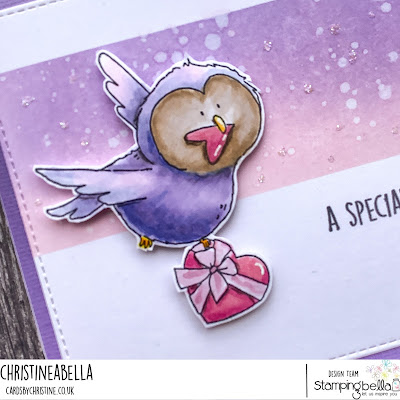
This time we're using stamps from the current stamp of the month range - that's Animal Friends - so I chose to use this fabulous Owl with the Heart - and I chose to use colours in the same tones as on the packaging..  cos I didn't want my owl to be just a boring owl colour!

I coloured and fussy cut the image, then created a background by masking the card panel with post it tape, then blending Distress Oxides together, then splattering with water.  I also added a touch of glitter too.  I adhered the owl with 3D foam pads, and added the sentiment which comes with the set.  I matted the card panel onto a purple card panel - then onto the card base.


Card Info:
Die - MFT Stitched Rectangles
Distress Oxides - Spun Sugar and Shaded Lilac
Colouring - Copics
Owl - BV31/20/00/11/13/04 RV000 E40/41/42/43 Y18
Hearts - RV32/34
Ribbon - RV91/93
White Gel Pen and Glitter

I'm loving how the owl turned out... and just wish he was on his way to me with that heart shaped gift!

Don't forget to pop over to the Stamping Bella Blog for more animal/bird inspiration.. and also to the Sistahood Facebook Page to share and chat all things Bella related.

Happy Crafting...

Sunday 12 February 2023

Spellbinders Mini Blooms


Hi Lovelies

Today I've a card to share with you using a gorgeous floral die set from Spellbinders.  

I diecut lots of the flowers and leaves from white card, then coloured them with Copics.  I then diecut the word three times, adhering them together to give depth to the word.  Then I diecut a scalloped oval - I've had that die for years and years - positioning the flowers and leaves around the edge.  Lastly, I placed the word at an angle across the centre, and added a few gems.  I matted the panel onto some glittery cardstock, then onto my card base.


Card Info:
Dies:
Spellbinders Mini Blooms, 
Spellbinders Yana Smakula Scripty Sentiments
Spellbinders Scalloped Ovals
Glitter Card Stock

Hope you like my make today..

Hugs

Friday 10 February 2023

Stamping Bella Curvy Girl Namaste


Hey Peeps

Another week has gone by, and it's time for another Bellarific Friday!  As we're highlighting images that aren't from the newest release today, I chose to use this lovely Namaste Curvy Girl..  love her!

I coloured and fussy cut the image - then created a stencilled and splattered background for her to sit in front of.  I stamped a sentiment from the Good Vibes sentiment set, then adhered the image with 3D foam pads, before matting and layering onto a card base.


Card Info:
Distress Oxides - Shaded Lilac and Wilted Violet
Die - MFT Stitched Rectangles
Colouring - Copics
Skin - E0000/000/21 R20
Hair - C0/1/3
Top - V20/22/25
Leggings - BV31


I think lilacs are among my all time favourite colours - second only to pink of course - so I was really happy how this turned out.

Don't forget to pop over to the Stamping Bella Blog for more inspiration from the Babes, and also to the Sistahood Facebook Page to chat and share all things Bella related!

Have a lovely weekend all...

Hugs

Monday 6 February 2023

Clearly Besotted Oops a Daisy - 2


Hi Peeps

I'm back again with another card using images from the Clearly Besotted Oops A Daisy stamp set..  what a fabbie set for Spring!

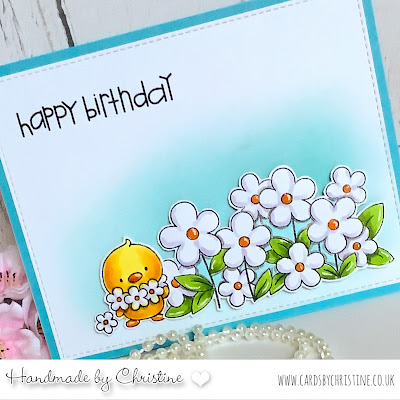
I coloured and fussy cut the daisies and the chick - then did a bit of Distress Oxide blending for the blue background... adhering the coloured images with 3D foam pads.  I finished off with a sentiment from Paper Smooches (no long available) in the top corner.


Card Info:
Image - Clearly Besotted Oops a Daisy
Sentiment - Paper Smooches
Die - MFT Stitched Rectangles
Distress Oxides - Tumbled Glass and Broken China
Colouring - Copics
Chick - Y13/15/17/18 YR24/04
Daisies - BV31
Leaves YG23/17

Hope you like my second make with this set...  I know there'll be more!

Big hugs

Saturday 4 February 2023

Clearly Besotted Oops a Daisy


Hi There...

I was lucky enough to order this Clearly Besotted Oops a Daisy stamp set before it sold out this week..  ordered on 1st (evening), posted on 2nd, received on 3rd, and played with today (4th!)

I chose to use a type of background that I've used before and always love - by using Post-It tape across my card panel to mask - then Distress Oxide blending, before splattering with watercolour paint - plus some gold of course!  Then I coloured and fussy cut these little cuties (I stamped the full set to use in the near future)..  they're so easy to colour as they're so small!  I stamped a sentiment (included in the set), then I adhered the chick with 3D foam pads.


Card Info:
Image and Sentiment - Clearly Besotted Oops a Daisy
Distress Oxides - Twisted Citron, Mowed Lawn and Rustic Wilderness
Die - MFT Stitched Rectangles
Colouring - 
Chicks - Y13/15/17/18 YR04/07/24
Daisies - BV31
White Gel Pen
Watercolour Paints

I hope you like my make today as much as I enjoyed making it - it made me think of Spring!  Watch this space for more chicks appearing soon...

Hugs

Friday 3 February 2023

Stamping Bella Guinea with a Key


Hi Lovelies..

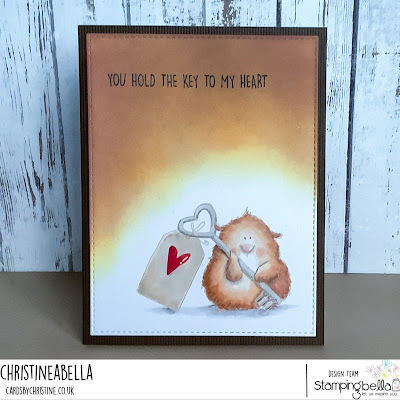
For our Bellarific Friday this week, it's Stamp of the Month time, so we're highlighting this little cutie Guinea Pig who is holding a massive key - to someone's heart. You can get this stamp with 50% discount throughout February - what a bargain!

I decided to do a bit of no-lines colouring for this image - I don't do it often, but thought it may be good with all the fur involved.. and I like how it turned out.


Card Info:
Distress Oxides - Wild Honey/Tea Dye/Gathered Twigs/ Aged Mahogany
Die - MFT Stitched Rectangles
Colouring - Copics
Guinea Pig - E50/51/53/55/13 R20
Key - W0/1/3
Label - E40/41/42 Heart R24/27/56
Grounding - N0/1

This is a perfect image for Valentine's Day - or just to tell someone how much they mean to you.  Hope you like what I created with it.

You can get lots more inspiration from the Babes on the Stamping Bella Blog - also you can pop over to the Sistahood Facebook Page - where you can chat and share all things Bella related.

Big Hugs...

Thursday 2 February 2023

RAM Stamps Puppy Love


Hi Peeps..

It's Release Day at RAM Stamps - and this collection is all about pets - so I chose to use this cutie called Puppy Love.

I coloured the image with my Copics - then diecut a circle around her.  Then I created my card base, by choosing a matching colour cardstock, and dry embossing it for one side of the base.  Then I simply adhered the circle with 3D foam pads to give it some depth.


Card Info:
Die - MFT Pierced Circle
Embossing Folder (sorry no name on it)
Colouring - Copics
Skin - E0000/000/00 R20
Hair - E40/41/42/43/44
Dress - BG10/11/13 
Puppy E30/31/33/34
Pinks - R81/83/00
Bowl and Ball- T0/1/2

Hope you like my make today..  it's an image that's so perfect to use for any little girl with a new little fur baby!

Big Hugs

Wednesday 1 February 2023

Sweet November Rosie with a Rose


Hi Lovelies...

I've been seeing lots of Sweet November Stamps appearing around blogland recently...  so I headed on over to take a look!  Wow - there are some fabulous images - lots of digitals - and of course, I had to buy!  But there are freebies too..  which is always nice to see!

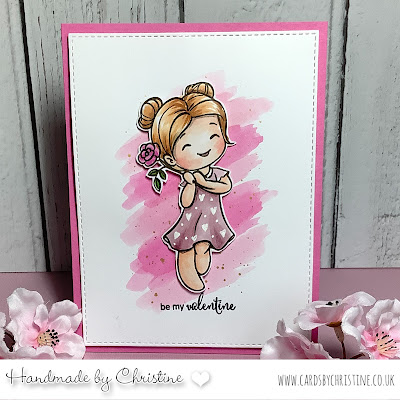
I chose to use this gorgeous Rosie with a Rose for my card today.  I coloured and fussy cut her - creating some hearts with white gel pen on her dress.  Then I created a background by just doing some simple watercolouring with Distress Inks, then splattering with gold.  Once again - it's difficult to get the gold to show in a photo - but I've done my best to try.  

I popped a little Valentine's sentiment on the panel, then adhered the image with 3D foam pads. Then I simply matted the panel to some pink cardstock.


Card Info:
Image - Sweet November Stamps Rosie with a Rose Digital Stamp
Sentiment - Clearly Besotted Fancy That Sentiment Set
Die - MFT Stitched Rectangles
Distress Inks - Picked Raspberry and Spun Sugar
Colouring - Copics
Skin - E0000/000/00 R20
Hair - E21/23
Dress - RV91/93/95
Rose - RV63/55 YG17
White Gel Pen
Gold Watercolour Paint


Hope you like my pink make today.  I know I'll be heading over to Sweet November again before too long!

Big hugs