Pages

Thursday, 28 August 2025

Purple Onion Designs Blue Days


Hi Lovelies…

Today, I'm sharing a card I made using the gorgeous Blue Days stamp from Purple Onion Designs - isn't it the cutest you've seen???  And it's in red rubber too, so stamps like a dream!

I coloured the image and added a sentiment also from Purple Onion, from their You and I set.  Then I used a stitched rectangle die, which I elongated to cover the whole image.  I backed the panel with a matching layer which I'd created using one of the darker colours in the image.  

Lastly, I added the patterned paper to my card panel with a strip of white over the join.  Then I adhered the coloured image - and it was done!


Card Info:
Image - Purple Onions Designs Blue Days
Sentiment Purple Onion Designs You and I
Paper - MFT Painted Prints Smitten
Die - MFT Stitched Rectangles
Colouring - Copics
Elephant - W0/1/2/3/5 R20 R000
Mouse - C0/1/3
Chicken - Y15/18 YR04
Flower - R25/46
Grass - G21/24

Hope you like my make today.. I'm looking forward to sending it to someone to make them smile - although I don't want any of my friends to feel down!

Big hugs

Tuesday, 26 August 2025

Waffle Flower Tropical Flowers Stencils


Hi Lovelies...

I've been doing a bit of stencilling - using the Waffle Flower Tropical Flowers Stencil set, which is made to fit with their postal die set.

I did the stencilling using Distress Inks, adding a tiny few marks with my Copics, to give depth.  Then I did the diecutting - and magic.. you have a set of postage stamps!  I stamped a few of the postal images in the corners... then added a sentiment which I'd embossed with gold.  I fussy cut a shadow around the sentiment and adhered it with foam pads.  I used some red card to layer behind the diecut.

Card Info:
Waffle Flower Postage Tropical Flowers Layering Stencils
Waffle Flower Postal Collage Colouring Stencils
Waffle Flower Postal Collage Die Set
Waffle Flower Postal Collage Stamps
Waffle Flower Postal Collage Birthday
Distress Inks
Gold Mirri Card

Hope you like my make today!

Happy Crafting...

Thursday, 21 August 2025

MFT Sweet Somebunny


Hi Lovelies..

For my card today, I've used a couple of the fabulous dies from Craft Addiction UK..  the Slatted Star set, and the Scallopstack Square Frames.  

Firstly, I had a smooshed pink background in my 'bits and bobs' box, so I used that to go behind the slats on the white star.  Then I used the next size up star cut from pink to go behind.  I diecut the scalloped square from white, and adhered that to my base card panel which is pink, adding the star.

This little bunny from MFT had been sitting on my desk all coloured up for a while, so it became centre stage on my card, sitting on a sentiment which is also from the same set.


Card Info:
Image and Sentiment - MFT Sweet Somebunny
Dies - Craft Addiction UK - Slatted Stars and Scallopedstack Squares
Colouring - Copics 
Pink Smooshed Background

Hope you like my card today - I loved how it turned out!

Happy Crafting...

Monday, 18 August 2025

Simon Says Stamp Beautiful Buttercups


Hi Lovelies..

Today, I’m sharing a card made with the Beautiful Butterflies die set from Simon Says Stamp. This set was part of my latest stash buy from across the pond!

So firstly, I diecut the flowers, and coloured them with Distress Oxides.. making the lower part of the petals a deeper shade.  I coloured the stems with Copics.  I also shaped the petals using a ball tool onto a hard sponge mat before putting the flower heads together with foam pads. I know there’s a technical term for the ball tool and pad, but I don’t know it!

Then I created the panel for the flowers to be attached to… I cut a rectangle of white card then scored it using my score board at equal distances apart.  I added the panel to pink card, then matted onto polka dot paper, and more pink card. I adhered the flowers with foam pads to the scored panel, glueing the stems.  Then I added the little tag, with a tiny bow to finish.


Card Info:
Dies - Simon Says Stamp Beautiful Buttercups
MFT Stitched Rectangles
Craft Addiction UK Mini Tag Collection
Anne Marie Dotty pink paper
Distress Oxides Pink Raspberry and Kitsch Flamingo
Copics 
Pink Cord

Hope you like my make today.. definitely back in my pink zone!

Happy Crafting…..

Thursday, 14 August 2025

Whimsy Stamps Gullible


Hi Lovelies..

Today I'm sharing a card I made after being inspired by my lovely friend, Christine Dol.  She sent me a fabulous card that used both the gull and the circle of words... of course, I had to buy them both so I could make with them too!  Thank you Christine! 

So.... I stamped the gull and added the wordsas she die, then did a little shading on the gull, before cutting the circles.  The sentiment set is going to be so useful in future as it has lots of different sentiments, all circular so they can go around lots of little images.

Then I created a background using blues (so he could be near the sea..) - I used paper from MFT paper pads... then added a ric-rac diecut to cover the join.  Finally I added it all to a navy blue card panel.


Card Info:
Image - Whimsy Stamps Gullible Stamp Set
Sentiment - Simon Says Stamp Circle Sayings
Papertrey Ink Ric Rac Die
MFT Paper Pads
Colouring - Copics
Glitter

Hope you like my card today..  the gulls in this set (there are lots!) really make me smile with their wonderful expressions!

Happy Crafting..

Monday, 11 August 2025

Simon Says Stamp Etched Layered Daisy (Card 3)


Hi Lovelies...

Today I'm back with my third card using this gorgeous Etched Layered Daisy die from Simon Says Stamp.

This time, I just used one of the flower heads, coloured again with Copics, then added to a pink card panel in the centre.  I added a white die cut panel, cut with a circle die in the centre, using foam tape to lift it off the pink.  I adhered the daisy to the pink card - then diecut another circle with my nesting dies to add around the aperture.  Believe me, it is central, but it looks anything but on the photos!  

The sentiment was added before I attached the white panel, so I could get a good impression.


Card Info:
Dies - Simon Says Stamp Etched Layered Daisy, 
Li'l Inkers Stitched Square, Spellbinders Circles
Sentiment - Papertrey Ink
Colouring - Copics
Stickles

I'll put this die away for a little while now..  but it's definitely one that I'll use a lot!

Happy Crafting...

Wednesday, 6 August 2025

Simon Says Stamp Daisy - Card 2!


Hi Lovelies..

Today I'm back with Daisy card number two..  this one is a very CAS card - all I did was diecut the daisy with it's leaves, and coloured it with Copics before adhering the pieces together. 

I heat embossed the sentiment in white onto a deep pink card panel, then adhered the daisy with foam pads to give the flower some shape.  I finished off the card with a few gems in the corner.


Card Info:
Image - Simon Says Stamp Etched Layered Daisy Die Set
Sentiment - MFT Something for Everything Stamp Set
Colouring - Copics
Crystal Gems

I had big ideas on what to add to the card when I was designing it, but decided it was far more elegant without.  You know what they say - Less is definitely more!

Happy Crafting...

Tuesday, 5 August 2025

Simon Says Stamp Etched Layered Daisy


Hi Lovelies...

Well, I got a lovely parcel that I'd ordered from Simon Says Stamp last week of some of their new bits and bobs..  I don't order very often, but when I do, I tend to play in my craft room lots when I receive them!

I've made three different cards with this fabulous Etched Layered Daisy die - I'll share the others later in the week.  It just shows how versatile they are.

Today, I cut three of the daisies, colouring them slightly in the centres to give depth, then adhering them together.  I didn't use the stem or leaves this time, but they are also in the set. I used tiny bits of foam tape to lift the petals, adhering the centres with glue.  For the trellis, I used an old Memory Box die, cut twice and laid alongside each other.  Lastly, I diecut some Tim Holtz Typeset letters to create the word from gold mirri card, which I adhered along the trellis.


Card Info:
Dies - Simon Says Stamp Etched Layered Daisy, Memory Box Trellis, 
Tim Holtz Typeset Letters, MFT Stitched Rectangle
Colouring - Copics
Petals - BV31, Flower Centres YR21/23/24
Gold Mirri Card

Hope you like my make today - I'll be back soon with another couple of cards made with these daisies!

Happy Crafting...

Wednesday, 30 July 2025

Craft Addiction UK Wings of Elegance - Blue


Hi Lovelies

As promised, here is the blue version of my card using the Wings of Elegance butterflies from Craft Addiction UK. 

This time I just used some smooshed card using Distress Oxides for the strips (splattered with gold) - the butterfly was cut from the original scrap of glitter card coloured with (I think) Alcohol Inks.  This scrap has been in my bit box for a few years I think!


Again, like the pink one I posted last, the sentiment is from MFT, as is the stitched rectangle die, and I've popped some gem stones on the butterfly's body.

Hope you like!

Hugs...

Friday, 25 July 2025

Craft Addiction UK Wings of Elegance


Hi Lovelies..

Sorry I've been quiet for a little while, we were away for a few days, but now I'm back after having a lovely holiday.

I was inspired for my card today when I saw Christine Stokes using some scrap coloured card she'd created, that she hadn't thrown, but when she cut these beautiful butterflies from it, looked fabulous!  Now I have a whole lot of scraps... so I dug this one out - it's been hanging around in my craft room for a couple of years, so I'm not entirely sure how I made it!  I think I used alcohol inks onto glitter card - but when I'd done it, I wasn't happy with it, so in the scrap pile it went!

All I did was diecut the butterflies from it, edging them with gold gilding wax.  I adhered two sizes together, then added tiny pearls to the body, which I then added to the butterflies.  Then I cut three long strips of watercoloured card, which I'd splattered with gold, adhering them to the  card panel.  The butterfly was then added at an angle.

Lastly, I stamped the sentiment below the strips, and matted the panel onto pink cardstock.


Card Info:
Dies - Craft Addiction UK Wings of Elegance, 
MFT Stitched Rectangles
Watercoloured Card
Gold Watercolour Paint
Gold Gilding Wax
Pearl Gems

Hope you like my make today... I'll be back very soon with a blue version!

Happy Crafting....

Wednesday, 9 July 2025

Creative Depot Flowers


Hi Lovelies...

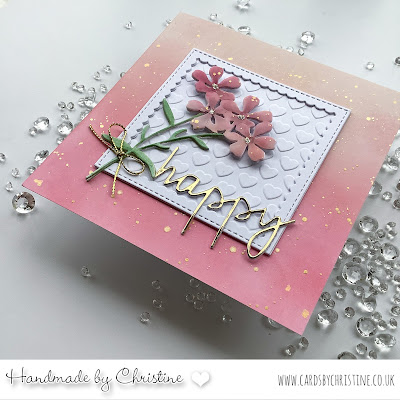
Today, I'm sharing a card I made with a floral die that has been in my stash for a few years, but it had 'disappeared' - in that I had no idea where it had been put!  Anyways... it turned up when I was looking for something else... so I thought it was about time it was used!

I'm back in my pink zone today, so firstly, I did some Distress Oxide blending on a card panel - splattered with gold watercolour paint.

I diecut the flowers 3 times from white cardstock, adhering them together.  Then I diecut just the flowers from coloured vellum that I'd previously printed out.  I splattered the vellum with gold, before adhering the flower heads to the white flowers.  I coloured the stems and leaves with Copics.

Then I created a square - using a square, scalloped frame, backing that with a panel of embossed hearts.  I adhered the square to my card panel, then adhered the flowers to the square.  Lastly, I diecut the word 'happy' to add to the square, and also added a gold bow to the flowers.


Card Info:
Dies - Creative Depot Flowers - CD-DI-949
MFT Stitched Square Scalloped Frame
Simply Graphic 'happy' word die
Hearts Embossing Folder (no name)
Distress Oxides - Tattered Rose and Worn Lipstick
Gold Watercolour Paint and Cord


Hope you like this card as much as I enjoyed making it - obviously it's my favourite colour, with a hint of gold!

Hugs and Happy Crafting...

Monday, 7 July 2025

Simon Says Stamp Posy


Hi Lovelies..

A relatively simple card from me today..  using this gorgeous little die from Simon Says Stamp called Posy.  

I diecut it three times from white cardstock, adhering them together to give a deep shape.  Then I diecut the flowers again from a purple smooshed background - adding the insides of the flowers into the white flower shape.  I decided against adding any green for the leaves - it seemed that the monochrome looked better to me. I adhered all this to a rectangle of purple cardstock, matted with gold mirri card, then added that to a further card sized piece of purple card.

Lastly, I added a little sentiment which I'd heat embossed in white onto the purple card, again, using gold mirri to matt.


Card Info:
Die - Simon Says Stamp Posy
Sentiment - MFT 
Distress Oxide - Dusty Concord
Gold Mirri Card

Hope you like my make today!

Big Hugs..

Friday, 4 July 2025

Pink and Main My Little Love Bugs - Heart


Hi Lovelies...

Well, I was having a little sort out of my desk the other day, and I came across this little pair canoodling in a corner!  They were already fussy cut and coloured up, so I though it was time that they hit the spotlight on my card today!

I used a Slatted Heart die over some shaded patterned paper to match their colouring.  I added a small sentiment from MFT, then adhered the panel to the background with foam tape.  Lastly, I added the lovey dovey pair, and my card was done!


Card Info:
Image - Pink and Main My Little Love Bugs
Sentiment - MFT
Dies - Craft Addiction UK Slatted Heart, 
Lil' Inkers Stitched Square
Colouring - Copics
Glitter for Wings

Hope you like my make today - I really love this stamp set, they're so darn cute!

Big hugs.....

Tuesday, 1 July 2025

Simon Says Stamp Cosmos Duo


Hi Lovelies......

Today I'm sharing a card I made with the Simon Says Stamp Cosmos Duo.  I've again used a slatted die from Craft Addiction, this time backing the slats with some patterened paper.

 I shaded the flowers carefully, then coloured the centres with a deep yellow, and the stems green.  I used a Waffle Flower sentiment stamped and heat embossed in white, and cut with the matching die.  I backed the panel with pink card to bring out the shades in the circle.


Card Info:
Dies - Simon Says Stamp Cosmos Duo, 
Craft Addiction UK Slatted Circle,
Lil' Inkers Stitched Square
Paper - Craft Consortium Ink Drops - Candy
Sentiment - Waffle Flower Birthday Wishes Set

It was rather difficult to get a good photograph.. I really am going to have to invest in better equipment I think to get the true colours of my makes!

Hope you like my card today..

Happy Crafting...

Tuesday, 24 June 2025

Alexandra Renke Flowers


Hi Lovelies

Sorry I've been a little quiet lately... it's been hot here in the UK, and my craft room temperature wasn't the best to be sitting in, making cards!

But I'm back today, this time with a card I've made for a friend on her retirement.  I used a slatted circle die from Craft Addiction UK, then a floral die set from Alexandra Renke.  I cut the whole set from white cardstock, but only used the stems and outlines, which I used gold pen to colour.  Then I cut the flowers from vellum which I'd printed a watercolour on and splattered with gold.  I adhered the vellum behind the frames, then added them to the circle which I'd diecut on my card panel.  I'd already printed the sentiment which I'd done on the PC.  Lastly, I backed the slatted circle with some pink cardstock on thin foam tape, adhering it all to my card base.  A little bow finished the flowers.


Card Info:
Floral Dies - Alexandra Renke
Slatted Circle Dies - Craft Addiction UK
Stitched Rectangle Die - MFT
Sentiment - done on PC
Gold Pen and Gold Watercolour Paint
Vellum and Hemp Cord


I've just added this close up so you can see the gold splatter better - depending on the weather, it's so difficult to photograph!

Hope you like my make today...

Happy Crafting

Thursday, 12 June 2025

Spellbinders Flowers

Hi Lovelies...

I'm back to die-cutting for my card today... along with a little bit of smooshing!

Firstly, I smooshed some bristol smooth card with some Picked Raspberry Distress Oxide, splattering it also with gold and deep pink watercolour paint.  Then I cut a panel the size of my card, slicing a corner off with an MFT border die.  I added my sentiment before adhering anything so it would stamp cleanly.  Then I adhered the panel to the smooshed corner. 

I then diecut lots of flowers and leaves, both from Spellbinders and other dies.. the large one was from pink card, but coloured to give dimension, and has a gold centre.  The smaller flowers were cut from the leftover smooshed card.  I tried to place them to look like they'd been sprinkled!


Card Info:
Sentiment - Waffle Flower Birthday Wishes
MFT Border Die
Flowers and Leaves - Spellbinders and others with no packaging!
Distress Oxide Picked Raspberry
Gold and Deep Pink Watercolour Paint
Gold Stickles


Hope you like my make today - I'm certainly in my pink and happy zone and was really pleased how this turned out.

Happy Crafting...